Dies ist die mehrseitige Druckansicht dieses Abschnitts.
Zum Drucken hier klicken .
Zur normalen Ansicht dieser Seite zurückkehren .
Aufgaben für Betreiber
Betriebsanleitungen zum Bereitstellen, Konfigurieren und Warten eines etcd-Clusters.
1 - Einen etcd-Democluster einrichten
Anleitung zum Einrichten eines etcd-Clusters
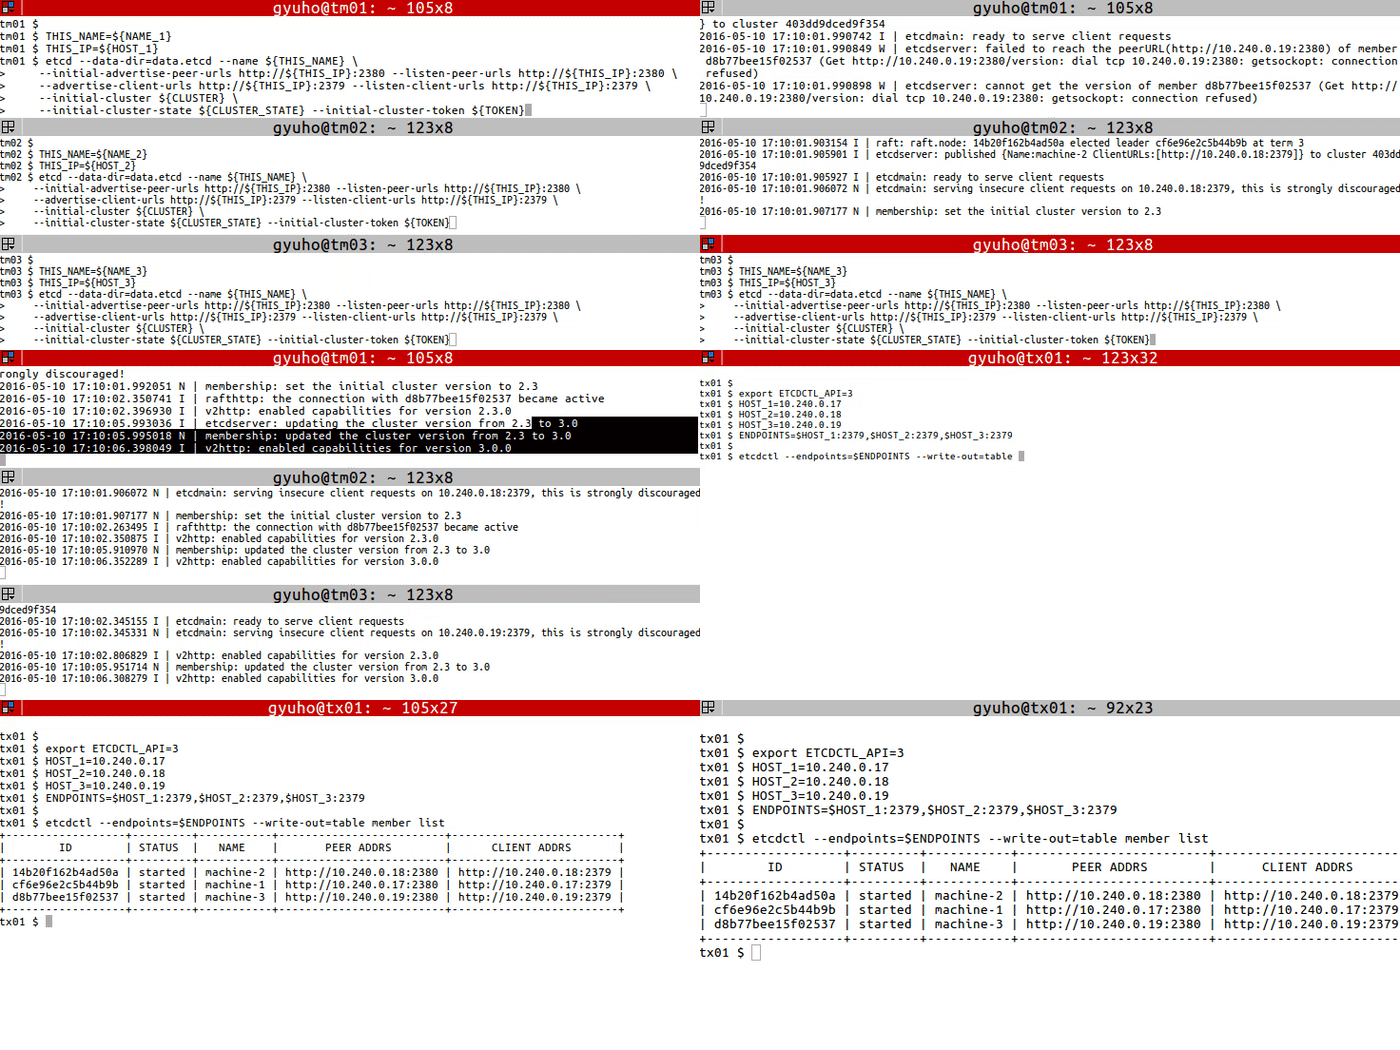
Auf jedem etcd-Knoten die Clustermitglieder angeben:
TOKEN = token-01
CLUSTER_STATE = new
NAME_1 = machine-1
NAME_2 = machine-2
NAME_3 = machine-3
HOST_1 = 10.240.0.17
HOST_2 = 10.240.0.18
HOST_3 = 10.240.0.19
CLUSTER = ${ NAME_1 } = http://${ HOST_1 } :2380,${ NAME_2 } = http://${ HOST_2 } :2380,${ NAME_3 } = http://${ HOST_3 } :2380
Auf jedem Rechner Folgendes ausführen:
# For machine 1
THIS_NAME = ${ NAME_1 }
THIS_IP = ${ HOST_1 }
etcd --data-dir= data.etcd --name ${ THIS_NAME } \
--initial-advertise-peer-urls http://${ THIS_IP } :2380 --listen-peer-urls http://${ THIS_IP } :2380 \
--advertise-client-urls http://${ THIS_IP } :2379 --listen-client-urls http://${ THIS_IP } :2379 \
--initial-cluster ${ CLUSTER } \
--initial-cluster-state ${ CLUSTER_STATE } --initial-cluster-token ${ TOKEN }
# For machine 2
THIS_NAME = ${ NAME_2 }
THIS_IP = ${ HOST_2 }
etcd --data-dir= data.etcd --name ${ THIS_NAME } \
--initial-advertise-peer-urls http://${ THIS_IP } :2380 --listen-peer-urls http://${ THIS_IP } :2380 \
--advertise-client-urls http://${ THIS_IP } :2379 --listen-client-urls http://${ THIS_IP } :2379 \
--initial-cluster ${ CLUSTER } \
--initial-cluster-state ${ CLUSTER_STATE } --initial-cluster-token ${ TOKEN }
# For machine 3
THIS_NAME = ${ NAME_3 }
THIS_IP = ${ HOST_3 }
etcd --data-dir= data.etcd --name ${ THIS_NAME } \
--initial-advertise-peer-urls http://${ THIS_IP } :2380 --listen-peer-urls http://${ THIS_IP } :2380 \
--advertise-client-urls http://${ THIS_IP } :2379 --listen-client-urls http://${ THIS_IP } :2379 \
--initial-cluster ${ CLUSTER } \
--initial-cluster-state ${ CLUSTER_STATE } --initial-cluster-token ${ TOKEN }
Oder unseren öffentlichen Discovery-Dienst verwenden:
curl https://discovery.etcd.io/new?size= 3
https://discovery.etcd.io/a81b5818e67a6ea83e9d4daea5ecbc92
# grab this token
TOKEN = token-01
CLUSTER_STATE = new
NAME_1 = machine-1
NAME_2 = machine-2
NAME_3 = machine-3
HOST_1 = 10.240.0.17
HOST_2 = 10.240.0.18
HOST_3 = 10.240.0.19
DISCOVERY = https://discovery.etcd.io/a81b5818e67a6ea83e9d4daea5ecbc92
THIS_NAME = ${ NAME_1 }
THIS_IP = ${ HOST_1 }
etcd --data-dir= data.etcd --name ${ THIS_NAME } \
--initial-advertise-peer-urls http://${ THIS_IP } :2380 --listen-peer-urls http://${ THIS_IP } :2380 \
--advertise-client-urls http://${ THIS_IP } :2379 --listen-client-urls http://${ THIS_IP } :2379 \
--discovery ${ DISCOVERY } \
--initial-cluster-state ${ CLUSTER_STATE } --initial-cluster-token ${ TOKEN }
THIS_NAME = ${ NAME_2 }
THIS_IP = ${ HOST_2 }
etcd --data-dir= data.etcd --name ${ THIS_NAME } \
--initial-advertise-peer-urls http://${ THIS_IP } :2380 --listen-peer-urls http://${ THIS_IP } :2380 \
--advertise-client-urls http://${ THIS_IP } :2379 --listen-client-urls http://${ THIS_IP } :2379 \
--discovery ${ DISCOVERY } \
--initial-cluster-state ${ CLUSTER_STATE } --initial-cluster-token ${ TOKEN }
THIS_NAME = ${ NAME_3 }
THIS_IP = ${ HOST_3 }
etcd --data-dir= data.etcd --name ${ THIS_NAME } \
--initial-advertise-peer-urls http://${ THIS_IP } :2380 --listen-peer-urls http://${ THIS_IP } :2380 \
--advertise-client-urls http://${ THIS_IP } :2379 --listen-client-urls http://${ THIS_IP } :2379 \
--discovery ${ DISCOVERY } \
--initial-cluster-state ${ CLUSTER_STATE } --initial-cluster-token ${ TOKEN }
Damit ist etcd einsatzbereit! So lässt sich mit etcdctl eine Verbindung zu etcd herstellen:
export ETCDCTL_API = 3
HOST_1 = 10.240.0.17
HOST_2 = 10.240.0.18
HOST_3 = 10.240.0.19
ENDPOINTS = $HOST_1 :2379,$HOST_2 :2379,$HOST_3 :2379
etcdctl --endpoints= $ENDPOINTS member list
2 - Eine Leader-Wahl in einem etcd-Cluster durchführen
Schritte zum Durchführen einer Leader-Wahl mit dem etcdctl-Client
Voraussetzungen
Sicherstellen, dass etcdetcdctl
Prüfen, ob ein etcd-Cluster aktiv ist.
Eine Leader-Wahl durchführen
Mit dem Befehl etcdctl werden Leader-Wahlen in einem etcd-Cluster durchgeführt. Er stellt sicher, dass jeweils nur ein Client Leader werden kann.
etcdctl --endpoints=$ENDPOINTS elect <election-name> [proposal]
etcdctl --endpoints= $ENDPOINTS elect election-name p1
Optionen
Adresse jedes Mitglieds des etcd-Clusters.
election-name Zeichenfolge
Eine Zeichenfolge als Kennung der Wahl. Alle Teilnehmer, die um die Leader-Rolle konkurrieren, müssen denselben Wahlnamen verwenden.
Vorschlagswert des neuen Leaders.
Beispiel
./etcdctl elect my-election proposal1
my-election/694d99fafea88404
proposal1

another election:
./etcdctl elect new-election proposal1
new-election/694d99fafea8840f
proposal1
3 - Den Clusterstatus prüfen
Anleitung zum Prüfen des Status eines etcd-Clusters
Voraussetzungen
Gesamtstatus prüfen
Mit endpoint status den Gesamtstatus jedes über die Option --endpoints angegebenen Endpunkts prüfen:
etcdctl endpoint status ( --endpoints= $ENDPOINTS | --cluster)
Optionen
--cluster[= false] : use all endpoints from the cluster member list
Funktionsfähigkeit prüfen
Mit endpoint health die Funktionsfähigkeit jedes über die Option --endpoints angegebenen Endpunkts prüfen:
etcdctl endpoint health ( --endpoints= $ENDPOINTS | --cluster)
Optionen
--cluster[= false] : use all endpoints from the cluster member list
KV-Hash prüfen
Mit endpoint hashkv den Hash des KV-Verlaufs jedes über die Option --endpoints angegebenen Endpunkts prüfen:
etcdctl endpoint hashkv ( --endpoints= $ENDPOINTS | --cluster) [ rev = $REV ]
Optionen
--cluster[= false] : use all endpoints from the cluster member list
--rev= 0: maximum revision to hash ( default: latest revision)
Von übergeordneten Befehlen geerbte Optionen
--endpoints= "127.0.0.1:2379" : gRPC endpoints
-w, --write-out= "simple" : set the output format ( fields, json, protobuf, simple, table)
Beispiele
etcdctl --write-out= table --endpoints= $ENDPOINTS endpoint status
+------------------+------------------+---------+---------+-----------+------------+-----------+------------+--------------------+--------+
| ENDPOINT | ID | VERSION | DB SIZE | IS LEADER | IS LEARNER | RAFT TERM | RAFT INDEX | RAFT APPLIED INDEX | ERRORS |
+------------------+------------------+---------+---------+-----------+------------+-----------+------------+--------------------+--------+
| 10.240.0.17:2379 | 4917a7ab173fabe7 | 3.5.0 | 45 kB | true | false | 4 | 16726 | 16726 | |
| 10.240.0.18:2379 | 59796ba9cd1bcd72 | 3.5.0 | 45 kB | false | false | 4 | 16726 | 16726 | |
| 10.240.0.19:2379 | 94df724b66343e6c | 3.5.0 | 45 kB | false | false | 4 | 16726 | 16726 | |
+------------------+------------------+---------+---------+-----------+------------+-----------+------------+--------------------+--------|
etcdctl --endpoints= $ENDPOINTS endpoint health
10.240.0.17:2379 is healthy: successfully committed proposal: took = 3.345431ms
10.240.0.19:2379 is healthy: successfully committed proposal: took = 3.767967ms
10.240.0.18:2379 is healthy: successfully committed proposal: took = 4.025451ms
etcdctl --cluster endpoint hashkv --write-out= table
+------------------+------------+---------------+
| ENDPOINT | HASH | HASH REVISION |
+------------------+------------+---------------+
| 10.240.0.17:2379 | 3892279174 | 3 |
| 10.240.0.18:2379 | 3892279174 | 3 |
| 10.240.0.19:2379 | 3892279174 | 3 |
+------------------+------------+---------------+
4 - Die Datenbank sichern
Anleitung zum Erstellen eines Snapshots der etcd-Datenbank
Voraussetzungen
Einen Snapshot der Datenbank erstellen
snapshot zum Speichern eines Snapshots der etcd-Datenbank zu einem bestimmten Zeitpunkt:
etcdctl --endpoints= $ENDPOINT snapshot save DB_NAME
Globale Optionen
etcdctl
--endpoints=[ 127.0.0.1:2379] , gRPC endpoints
Ein Snapshot kann nur von einem einzelnen etcd-Knoten angefordert werden. Daher sollte die Option --endpoints nur einen Endpunkt enthalten.
etcdutl
-w, --write-out string set the output format ( fields, json, protobuf, simple, table) ( default "simple" )
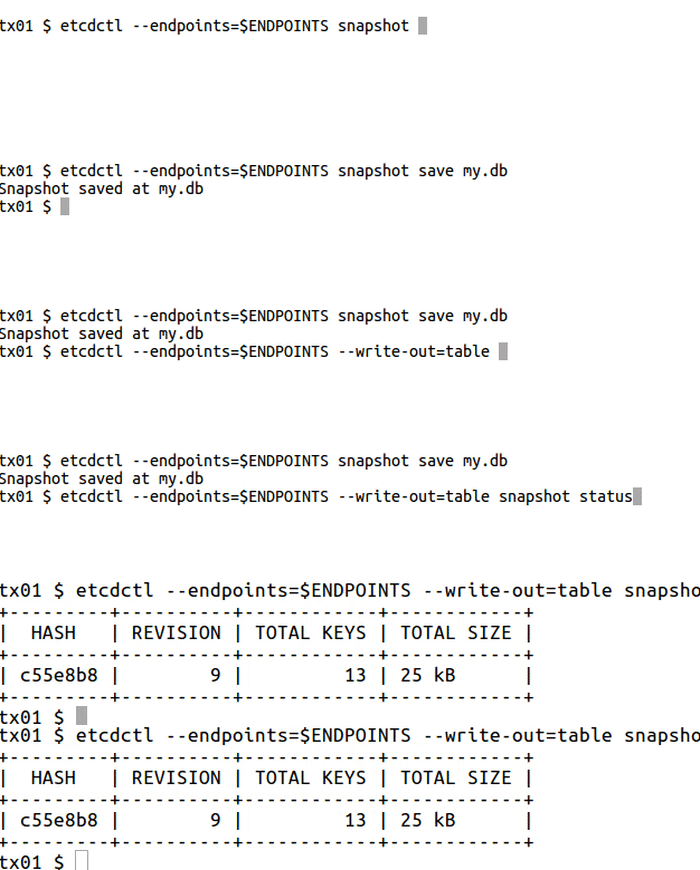
Beispiel
ENDPOINTS = $HOST_1 :2379
etcdctl --endpoints= $ENDPOINTS snapshot save my.db
Snapshot saved at my.db
etcdutl --write-out= table snapshot status my.db
+---------+----------+------------+------------+
| HASH | REVISION | TOTAL KEYS | TOTAL SIZE |
+---------+----------+------------+------------+
| c55e8b8 | 9 | 13 | 25 kB |
+---------+----------+------------+------------+
5 - Mitglieder hinzufügen und entfernen
Anleitung zur Verwaltung der Mitgliedschaft in einem etcd-Cluster
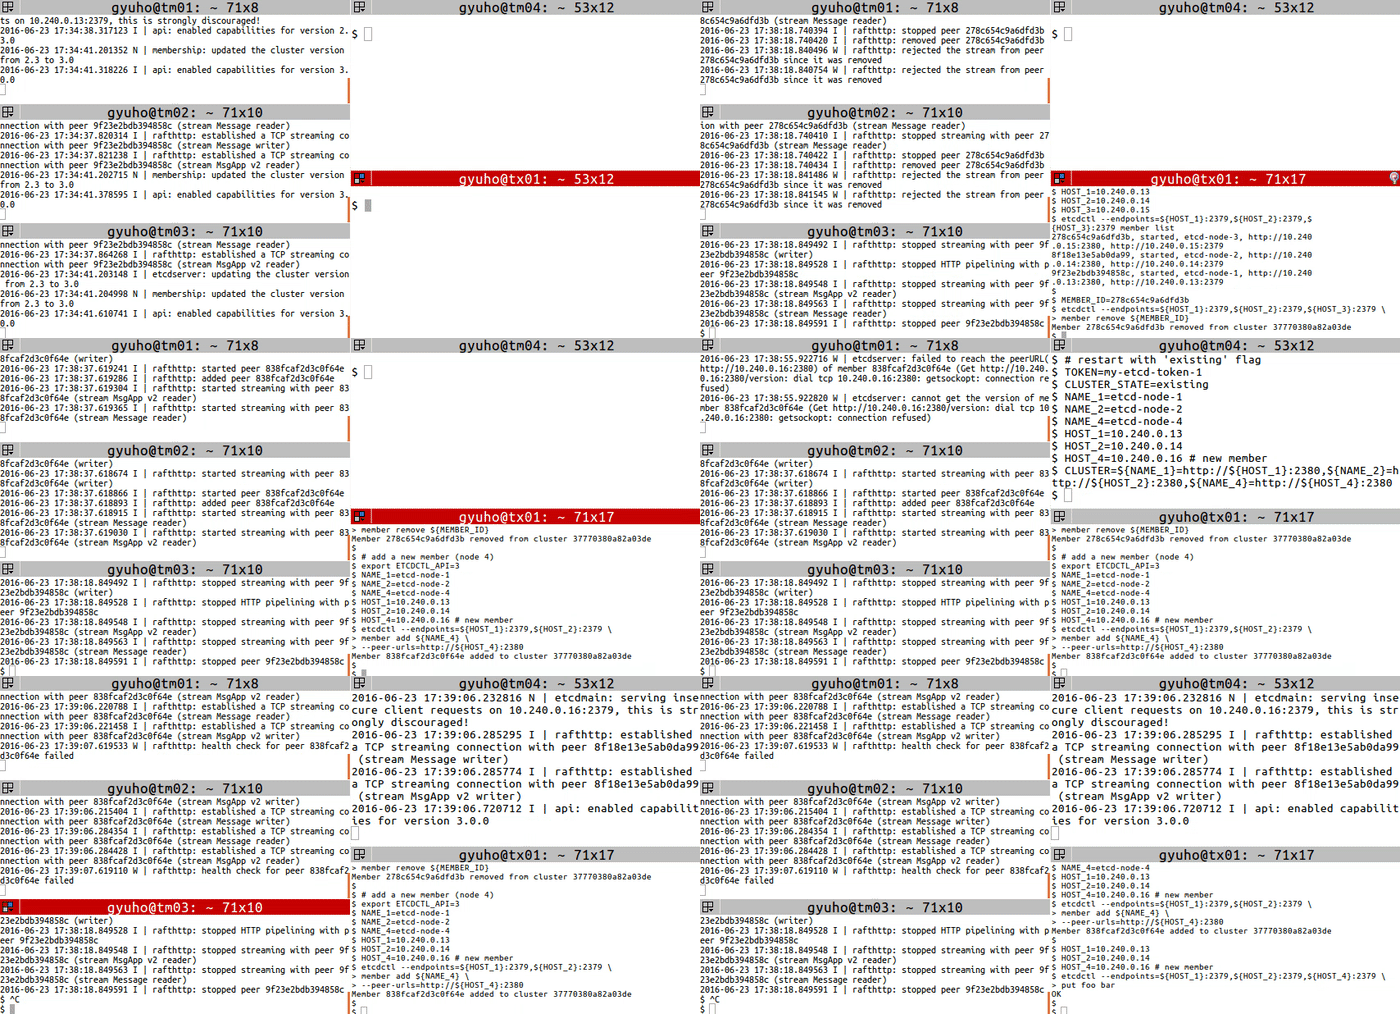
member zum Hinzufügen, Entfernen und Aktualisieren von Mitgliedern:
# For each machine
TOKEN = my-etcd-token-1
CLUSTER_STATE = new
NAME_1 = etcd-node-1
NAME_2 = etcd-node-2
NAME_3 = etcd-node-3
HOST_1 = 10.240.0.13
HOST_2 = 10.240.0.14
HOST_3 = 10.240.0.15
CLUSTER = ${ NAME_1 } = http://${ HOST_1 } :2380,${ NAME_2 } = http://${ HOST_2 } :2380,${ NAME_3 } = http://${ HOST_3 } :2380
# For node 1
THIS_NAME = ${ NAME_1 }
THIS_IP = ${ HOST_1 }
etcd --data-dir= data.etcd --name ${ THIS_NAME } \
--initial-advertise-peer-urls http://${ THIS_IP } :2380 \
--listen-peer-urls http://${ THIS_IP } :2380 \
--advertise-client-urls http://${ THIS_IP } :2379 \
--listen-client-urls http://${ THIS_IP } :2379 \
--initial-cluster ${ CLUSTER } \
--initial-cluster-state ${ CLUSTER_STATE } \
--initial-cluster-token ${ TOKEN }
# For node 2
THIS_NAME = ${ NAME_2 }
THIS_IP = ${ HOST_2 }
etcd --data-dir= data.etcd --name ${ THIS_NAME } \
--initial-advertise-peer-urls http://${ THIS_IP } :2380 \
--listen-peer-urls http://${ THIS_IP } :2380 \
--advertise-client-urls http://${ THIS_IP } :2379 \
--listen-client-urls http://${ THIS_IP } :2379 \
--initial-cluster ${ CLUSTER } \
--initial-cluster-state ${ CLUSTER_STATE } \
--initial-cluster-token ${ TOKEN }
# For node 3
THIS_NAME = ${ NAME_3 }
THIS_IP = ${ HOST_3 }
etcd --data-dir= data.etcd --name ${ THIS_NAME } \
--initial-advertise-peer-urls http://${ THIS_IP } :2380 \
--listen-peer-urls http://${ THIS_IP } :2380 \
--advertise-client-urls http://${ THIS_IP } :2379 \
--listen-client-urls http://${ THIS_IP } :2379 \
--initial-cluster ${ CLUSTER } \
--initial-cluster-state ${ CLUSTER_STATE } \
--initial-cluster-token ${ TOKEN }
Anschließend ein Mitglied mit den Befehlen member remove und member add ersetzen:
# get member ID
export ETCDCTL_API = 3
HOST_1 = 10.240.0.13
HOST_2 = 10.240.0.14
HOST_3 = 10.240.0.15
etcdctl --endpoints= ${ HOST_1 } :2379,${ HOST_2 } :2379,${ HOST_3 } :2379 member list
# remove the member
MEMBER_ID = 278c654c9a6dfd3b
etcdctl --endpoints= ${ HOST_1 } :2379,${ HOST_2 } :2379,${ HOST_3 } :2379 \
member remove ${ MEMBER_ID }
# add a new member (node 4)
export ETCDCTL_API = 3
NAME_1 = etcd-node-1
NAME_2 = etcd-node-2
NAME_4 = etcd-node-4
HOST_1 = 10.240.0.13
HOST_2 = 10.240.0.14
HOST_4 = 10.240.0.16 # new member
etcdctl --endpoints= ${ HOST_1 } :2379,${ HOST_2 } :2379 \
member add ${ NAME_4 } \
--peer-urls= http://${ HOST_4 } :2380
Danach das neue Mitglied mit der Option --initial-cluster-state existing starten:
# [WARNING] If the new member starts from the same disk space,
# make sure to remove the data directory of the old member
#
# restart with 'existing' flag
TOKEN = my-etcd-token-1
CLUSTER_STATE = existing
NAME_1 = etcd-node-1
NAME_2 = etcd-node-2
NAME_4 = etcd-node-4
HOST_1 = 10.240.0.13
HOST_2 = 10.240.0.14
HOST_4 = 10.240.0.16 # new member
CLUSTER = ${ NAME_1 } = http://${ HOST_1 } :2380,${ NAME_2 } = http://${ HOST_2 } :2380,${ NAME_4 } = http://${ HOST_4 } :2380
THIS_NAME = ${ NAME_4 }
THIS_IP = ${ HOST_4 }
etcd --data-dir= data.etcd --name ${ THIS_NAME } \
--initial-advertise-peer-urls http://${ THIS_IP } :2380 \
--listen-peer-urls http://${ THIS_IP } :2380 \
--advertise-client-urls http://${ THIS_IP } :2379 \
--listen-client-urls http://${ THIS_IP } :2379 \
--initial-cluster ${ CLUSTER } \
--initial-cluster-state ${ CLUSTER_STATE } \
--initial-cluster-token ${ TOKEN }